Ado Sector Campaign - Part 3
Part 2

Assault on Lachindra Station


1st Battle of Tylaq


Welcome back; the Ado Sector Campaign continues with no end to the troubles for the Galactic Empire in sight. After the 2nd Battle of Omicron-Ceti the two forces seemed to take a step back from each other. Like two punch-drunk boxers, the Rebel Alliance and the Galactic Empire needed a moment to recover from their respective losses and review their plans.

The Rebel ships continued their scouting of Imperial systems, running when encountering Imperial vessels, broadcasting propaganda and news of Imperial atrocities when not. This campaign to win the hearts and minds of the sector's populace came to a head when a Rebel squadron revisited the Killisu system, a place they had visited before in an attempt to forge an alliance with the pirate group based there. Upon arriving in orbit of the inhabited planet, the Rebels discovered a horrible truth. It appeared the planet had been subject to a Base Delta Zero, the complete destruction of the planetary surface through orbital bombardment. The Imperials hadn't landed ground forces to arrest the criminals based there, they simply exterminated them from orbit. The Imperials even went as far as destroying or de-orbiting all the orbital infrastructure, leaving nothing for the Rebels to use. Apparently, there were no depths the Imperials wouldn't stoop to.
Days later the Rebel commander devised a devious plan. A small squadron of corvettes made their way to Lauper's World, a privately owned system designed as a retreat for members of the Kuat Drive Yards Corporation. Upon entry to the system, the Rebel ships chased down as many of the luxury yachts and pleasure craft as possible and forced them to land on the planet. Once evacuated, the corvettes destroyed the craft from orbit and then began targeting any vacant villas and entertainment centers. Meanwhile, several corvettes targeted the primary ocean with a limited bombardment, vaporizing millions of tons of ocean water and filling the skies with precipitation. In only a few days the world would experience cloud filled skies and wet weather like this vacation world had never seen. Satisfied that their work was done the corvettes made a hasty retreat.
This odd endeavor seemed to have worked as shortly afterword, Admiral Risser received a transmission from the legal department of Kuat Drive Yards indicating imminent legal action. A transmission that was also sent to the Grand Moff. The ramifications of this little excursion are still being felt.
After quite a few quiet days interspersed with shenanigans like Lauper's World, a major battle took place.
Assault on Lachindra Station
The Lachindra system is home to an Imperial supply base, orbital control platform, and small dockyard capable of servicing up to frigate sized vessles. After limited scouting, the Rebels decided on a plan to assault this important system.

High above Lachindra Prime sat the dockyards, a forward repair base intended to service light Imperial warships. Critically, the system housed a supply depot on the planet's surface that provided munitions to the Imperial fleet in the area.

Lachindra Prime was orbited by an XQ4 Class Space Platform providing orbital control. (I have a model for this station on its way from Shapeways but it hadn't arrived in time for the battle so a substitute was used) This platform featured a limited turbolaser armament and several squadrons of TIEs. Assigned to the station was a squadron of IPV-1 Patrol Craft that could be found patrolling the local space.

In an instant, the normal day for this Imperial garrison got more complicated. Exiting hyperspace as close to the planet's gravity well as they dared, a Dauntless Class Star Destroyer and a Liberator Class Heavy Cruiser disturbed the sleepy Imperials. Their starfighter compliments arrived with them; Z-95s, B-Wings, A-Wings, and Y-Wings stood ready to deliver freedom.

Immediately the platform began launching its starfighters, as outnumbered as they would be. The IPV-1s began to form up, tiny gnats in comparison to the huge Rebel ships. This encounter felt like a reverse of the past years of the Rebellion.

The IPV-1s charged at the leviathans in a desperate attempt to give the platform time to organize its defenses. Between the fleets, civilian transports and freighters accelerated to get out of the way.

In a Hail-Mary maneuver, the station launched its assault shuttles loaded with proton torpedoes at the Liberator escorted by a single squadron of TIE/In Interceptors. Facing off against this were two squadrons of A-Wings, two squadrons of Z-95s, and two squadrons of Y-Wings.

This desperate attempt ended mostly in failure. The TIE Interceptors were destroyed taking an A-Wing squadron with them. The ATR-6s were eventually destroyed by the massed Rebel fighters but did manage to get off a few torpedoes which did light damage to the Liberator. As this happened, the Dauntless fired her entire compliment of turbolasers at the station and vaporized it in short order. The Liberator targeted the IPV-1s and they soon joined the station in death.
Upon seizing control of the orbitals, the Rebel commander called in a group of transports that had been waiting at the edge of the system. These transports carried a battalion of Rebel troops which immediately assaulted the ground facility, killing or capturing the Imperial occupants and generally wrecking the place. When Imperial starships returned to this system they discovered wreckage in orbit and a wrecked and empty ground facility.
1st Battle of Tylaq
Ever since the Rebels had performed a daring raid on the Tylaq system and freed many Twi'lek slaves, they promised to return and finish the job. A few days after the assault on Lachindra station the Rebels made good on that promise.

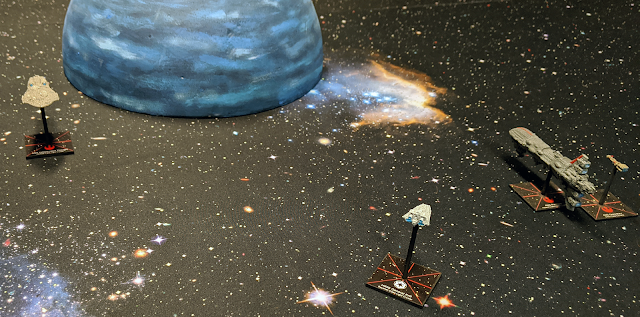
Dropping out of hyperspace, a group of Rebel starships surprised the few Imperial vessels near Tylaq Prime at its parent gas giant. An Assault Class Heavy Cruiser, MC40 Class Cruiser, MC30 Class Cruiser, CR90 Class Corvette, and a Bayonet Class Frigate presented a strong force. The Bayonet was the HIMS General Krill, captured in the 2nd Battle of Omicron-Ceti, re-crewed and now serving the Alliance.

Facing this fleet was a lone Nebulon-B Frigate and four CR90 Class Corvettes. The firepower disparity was too great and the only choice obvious, retreat.

The CR90s immediately turned away from the Rebels and accelerated with every thing they had. Noticeably slower than the little blockade runners, the Nebulon-B made for the gas giant. She also launched her TIE/Sa Bombers alongside her TIE/Ln Fighters.

The Rebel fleet accelerated into the planetary system and began firing at long range at the fleeing Imperial ships. At this range the fire did little more than tickle the Imperials, though the Nebulon-B's rear shields did drop and some scoring on the hull was felt.

As the Rebel fleet pushed closer to the Imperial frigate, she decided to launch a spoiling attack using her starfighter squadrons. The bombers, loaded with proton torpedoes, were escorted by the fighter squadron into the MC30, the closest ship to the Nebulon-B. The only squadron with the Rebel fleet were A-Wings from the MC40. The TIE/Ln Fighters engaged the A-Wings in a furball, resulting in mutual destruction, while the bombers loosed their torpedoes on the MC30. These torpedoes tore into the ship rending holes straight through her hull and knocking out systems across half the ship. The spoiling attack seemed to have worked.

As the Nebulon-B accelerated around the gas giant, the Rebel fleet split to encircle the ball of hydrogen hoping to cut off escape routes. The Rebels knew they were faster than the Imperial frigate but the gas giant could give it the time to get enough distance to enter hyperspace.

The MC30, venting atmosphere turned away from the group to lick her wounds.

At this point it became obvious that the CR90s would likely make their escape leaving the Nebulon-B as the prime target for the Rebels.

But the Nebulon-B managed to hug close to the upper atmosphere of the gas giant and avoided enemy fire for a little while longer, but the Rebels were gaining.

Unfortunately, while the Assault Cruiser had been avoided for now, it appeared that in mere moments the MC40 would come round the other side of the planet and finish the frigate.

Orbital mechanics were played out and the Assault Cruiser remained blocked from the frigate along with her attendant CR90 and Bayonet Frigate.

But in a surprising and perhaps brilliant move the Nebulon-B had not attempted to avoid the MC40, rather she turned into her accelerating all the way and she was not alone. Two of the CR90s had performed a crazy turning maneuver placing themselves between the frigate and the cruiser. Finally, the Nebulon-B launched her reloaded bombers at the Rebel cruiser on a suicide mission. At this range the MC40s light turbolasers would spell the end of the frigate but with a TIE/Sa Bomber squadron bearing down on it, the cruiser would likely defend itself first. In the ensuing firefight, the cruiser's shields were damaged, the bombers destroyed, and the Nebulon-B received significant damage but remained whole.

This maneuver had slingshot-ed the Nebulon-B out past the MC40 and left the Assault Cruiser well behind. In another few moments she was clear of the gas giant's gravity well and entered hyperspace along with all four CR90s.
The 1st Battle of Tylaq should not have been an interesting game but the brilliance and heroics of the Imperial squadron made it so. The Rebels had captured Tylaq and caused some damage to the Imperial vessel but paid the price of significant damage to one of their cruisers.


Comments
Post a Comment