Outer Rim Blues
Hello everyone and welcome to the outer rim, home of devious smugglers, vicious pirates, and lonesome Imperial patrols. This past Friday I invited my good friend Simon over for a game of Metaverse. We decided to pull out my newest Star Wars models and give them a good blooding. For the scenario I picked a lone Imperial heavy cruiser on patrol in the outer rim. Rebel Intelligence has identified this ship as a prime target due to its isolation and plan an attack. Simon chose to play the Rebels which left me the unenviable job of keeping the heavy cruiser alive.
The forces available were the following:
Imperial
HIMS Peremptory - Vindicator Class Heavy Cruiser Mk II
4x TIE/Ln Squadrons
1x TIE/In Squadron
1x TIE/Sa Squadron (Proton Torpedoes)
4x XG-1 Star Wing Flights (Proton Torpedoes & Concussion Missiles)

Rebel Alliance
ANS Paragon - Assault Cruiser
ANS Whisper - Quasar Fire Class Cruiser
1x T-65 X-Wing Squadron (No Ordinance)
1x BTL Y-Wing Squadron (Proton Torpedoes)
1x RZ-1 A-Wing Squadron (Concussion Missiles)
1x Z-95 Headhunter Squadron (No Ordinance)
ANS Freedom's Grasp - CC-7700/E Class Cruiser
4x CR90 Class Corvettes (ANS Beacon, Dodonna's Pride, Frazier, Quickdraw)
8x Hammerhead Corvettes (ANS Frenzy, Razor, Tranquility, Nightingale, Intervention, Actium, Emancipator, Rascal)
1x SF-01 B-Wing Squadron (Proton Torpedoes)
For the scenario objectives we decided that the obvious target for the Imperials was the CC-7700/E Cruiser. This budget interdictor was a strategic asset for the Rebel Alliance that any Imperial commander would receive a promotion for destroying. Conversely the Rebels had only one target in mind, the heavy cruiser. It was also possible for the Imperials to gain reinforcements throughout the game, something that I forced the Rebels to roll for as it seemed crueler that way.
 As with any of my games we were not without the appropriate libations, in this case a 16 year old Scotch.
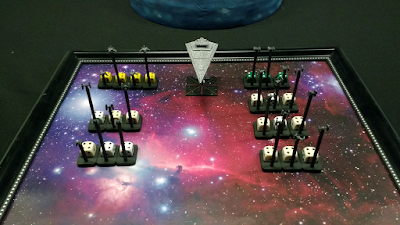
 Sufficiently lubricated we began deploying our forces. I secretly recorded my starting position and then Simon deployed his forces on to the table. When he was done I placed my ships.
 It was revealed that the HIMS Peremptory was in a standard orbit of a local gas giant.
 The heart of the Rebel fleet was just over a light second away at the Peremptory's 8 o'clock.
 At the Peremptory's 10 o'clock was a group of corvettes...
 and on the other side of the planet were more corvettes and a squadron of hungry B-Wings.
 This presented something of a tactical conundrum for the Imperial commander. With the Rebel capital ships nearly to his rear and himself in an orbital trajectory, simply turning to face them would be a fight against Newton himself. However swinging all the way around the planet would take time, letting the Rebels get organised. Analyzing the situation the Imperial commander chose what he thought was a clever solution. Still orbiting the gas giant the Peremptory began a slow climb from the depths of the gravity well into a higher orbit. This made it look as though he was going to swing out around the planet and engage the far off corvettes. Hoping for the right reaction he watched the Rebel response anxiously.
 The corvette group on the far side of the planet turned to intercept the Peremptory should she orbit the planet. While unlikely to defeat the big ship themselves they could certainly distract her.
 The Rebel capital ships fired their engines at full power hoping to come into range of the Imperial ship with its rear still facing them. With this the Imperial commander let slip a small grin, that is until Rebel fighters began to thunder forward. The Rebel fleet sent forth a strike mission containing a squadron of Y-Wings loaded with proton torpedoes escorted by an A-Wing squadron loaded with concussion missiles. Ahead of this group he sent an intercept mission of X-Wings to "plow the road".
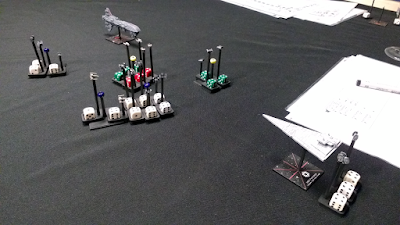
 As this orbital pursuit played itself out, everyone just out of range, an Imperial reinforcement arrived. The HIMS Helldiver (Arquitens Class Corvette) entered the far end of the table opposite the Rebel corvettes with an IPV-1 Patrol Corvette under tow. Far out of position, the corvettes fired their engines at maximum burn.
 Looking at the Rebel capital ships maneuvering at full thrust the Imperial commander decided that it was time to enact his plan. Rather than continue around the gas giant, the HIMS Peremptory swung to port and broke out of orbit. With its own engines at full burn, the heavy cruiser managed to keep out of weapons range and continued to dump TIE fighters out of its hanger bay.
 Continuing its hard turn to port, the HIMS Peremptory sent out an intercept mission containing a squadron of TIE Interceptors and a squadron of TIE Fighters. This mission was soon met by the Rebel intercept mission containing a squadron of X-Wings. The furball would remain entangled for some time.
 As the HIMS Peremptory swung around to port the Rebel capital ships entered weapons range. With only its port weapons to bear, the heavy cruiser was at a firepower disadvantage against the ANS Paragon (Assault Cruiser). However, the Imperial commander knew that once he completed his turn the balance of power would swing back in his direction. Turbolasers, Ion Cannons, and Laser Cannons emitted their bolts of destruction between the cruisers, splashing shields but failing to do any hull damage on either side of the firefight. Amidst the Gigajoules the HIMS Peremptory sent out another intercept mission containing two squadrons of TIE Fighters towards the rebel strike mission and a strike mission containing the four flights of assault gunboats towards the Rebel corvettes.
 With the turn now complete, the HIMS Peremptory was finally able to bear her full firepower against the ANS Paragon. Green death continued to cross the vacuum, shields flaring and nearly collapsing on the Rebel side. Meanwhile the X-Wings broke off after losing 7 of their 12 fighters, having killed nearly all the TIE Interceptors. Desperate to chase them down, the remaining TIE Fighters came under laser cannon fire from the Rebel Corvettes. Having finished our two fingers of scotch each and two or three beers as chasers we decided to open up a bottle of wine, Gamay Noir, a specialty of Southern Ontario.
 Sipping his wine, the Rebel commander decided that the B-Wings would be too late to the melee on the other side of the gas giant and turned the squadron against the incoming Imperial reinforcements. Certainly overkill to anyone counting.
 Hoping that the assault cruiser could withstand the Imperials attempts to destroy her for a little while longer, the Rebel commander moved in his strike group against the Peremptory. Attempting to counter this move, the Imperial commander moved two squadrons of TIE Fighters to intercept the bombers leaving a single squadron of TIE Fighters on CAP as his only reserve. The decision making process here was taking longer than normal and we began to realize it. We had been doing more drinking than rolling dice.
 Despite our inebriation we soldiered on. The two sides rapidly closed the distance and thereby increased the effectiveness of our weaponry. A large furball formed in the space between the capital ships as X-Wings, Y-Wings, A-Wings, and TIE Fighters mixed it up. Sneaking around the side a squadron of TIE Bombers moved in as a coup-de-grace on the ANS Paragon. Failing to destroy each other in that moment the two commanders realized that at their closing speed the two ships were going to scream right past each other, all according to plan so said the Imperial commander. This would place the Peremptory in firing position on the Rebel interdictor. Feeling the effects of the night on our thought process and seeing the Imperial commander's plan come to fruition we had to put the dice down for the night.
I had a good load of fun with this game proving that winning, losing, or even finishing the game are secondary to the company you play with. Having a 16 year old scotch to start the game doesn't hurt either. Next time Simon and I play I think we are going to put a little more emphasis on the game and less on the conversation, though it will be tough to do!
Thank you to Simon for coming over for a game and thanks to Jack for popping over, watching us play, drinking our alcohol, and giving critique whenever we didn't ask for it.
The rules we used can be found here: http://metaverse.battlespacepublishing.ca/
Our facebook group can be found here: https://www.facebook.com/groups/battlespacepublishing.ca/
The forces available were the following:

Imperial
HIMS Peremptory - Vindicator Class Heavy Cruiser Mk II
4x TIE/Ln Squadrons
1x TIE/In Squadron
1x TIE/Sa Squadron (Proton Torpedoes)
4x XG-1 Star Wing Flights (Proton Torpedoes & Concussion Missiles)

Rebel Alliance
ANS Paragon - Assault Cruiser
ANS Whisper - Quasar Fire Class Cruiser
1x T-65 X-Wing Squadron (No Ordinance)
1x BTL Y-Wing Squadron (Proton Torpedoes)
1x RZ-1 A-Wing Squadron (Concussion Missiles)
1x Z-95 Headhunter Squadron (No Ordinance)
ANS Freedom's Grasp - CC-7700/E Class Cruiser
4x CR90 Class Corvettes (ANS Beacon, Dodonna's Pride, Frazier, Quickdraw)
8x Hammerhead Corvettes (ANS Frenzy, Razor, Tranquility, Nightingale, Intervention, Actium, Emancipator, Rascal)
1x SF-01 B-Wing Squadron (Proton Torpedoes)
For the scenario objectives we decided that the obvious target for the Imperials was the CC-7700/E Cruiser. This budget interdictor was a strategic asset for the Rebel Alliance that any Imperial commander would receive a promotion for destroying. Conversely the Rebels had only one target in mind, the heavy cruiser. It was also possible for the Imperials to gain reinforcements throughout the game, something that I forced the Rebels to roll for as it seemed crueler that way.


I had a good load of fun with this game proving that winning, losing, or even finishing the game are secondary to the company you play with. Having a 16 year old scotch to start the game doesn't hurt either. Next time Simon and I play I think we are going to put a little more emphasis on the game and less on the conversation, though it will be tough to do!
Thank you to Simon for coming over for a game and thanks to Jack for popping over, watching us play, drinking our alcohol, and giving critique whenever we didn't ask for it.
The rules we used can be found here: http://metaverse.battlespacepublishing.ca/
Our facebook group can be found here: https://www.facebook.com/groups/battlespacepublishing.ca/


The King Casino Resort - Hertzaman
ReplyDeleteFind poormansguidetocasinogambling.com the perfect place to 바카라 사이트 stay, play, herzamanindir.com/ and unwind at Harrah's Resort Southern California. Get your ventureberg.com/ points https://deccasino.com/review/merit-casino/ now!