A Splash of Independance
Good morning everyone, yesterday my Brother came by with his new American War of Independence collection and put on a game for my Father and I. This latest project is a beautiful one and although not a period that I would model myself, certainly one that I have little problem with playing.
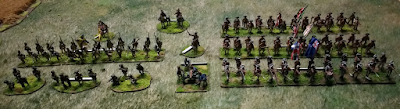
The British contingent thus far consists of two brigades as follows:
Major General Pigot
1st Brigade - Brigadier General Smith
22nd Cheshire Regiment of Foot
54th West Norfolk Regiment of Foot
Prince of Wales American Regiment
6pdr Artillery Battery
2nd Brigade - Brigadier General Lossberg
Fusilier Regiment Von Ditfurth
Hesse-Kassel Feld-Jager Korps

The Colonial contingent thus far consists of two brigades as follows:
Major General Sullivan
1st Brigade - Major General Greene
1st Rhode Island Regiment of Continentals
2nd Rhode Island Regiment of Continentals
6pdr Artillery Battery
2nd Brigade - Brigadier General Glover
Jacob's Regiment of Massachusetts Militia
Lauren's Detachment (Light Infantry)
3pdr Artillery Battery
1st Continental Light Dragoons
It does not take a keen eye to notice that the basing of the 1st Continental Light Dragoons is not finished. Objections were raised; objections were over-ruled; the Cavalry would play.
The scenario presented was simple; the Colonial militia would fight a delaying action against the entirety of the Loyalist force while the Continental Regulars would rush to relieve them.

The Loyalists advanced their Hessian mercenaries up the left flank with the Jagers in the lead.

Meanwhile the British and Loyalist Regulars advanced up the center.

Facing the Hessians were the Colonial Light Infantry deployed in a small woods.

Facing the three regiments of Loyalists was Jacob's Regiment of Massachusetts Militia and a 3pdr Artillery Battery.

Advancing as fast as possible (not fast enough for the Militia, based on their comments) was the 1st Brigade of Continental Regulars. One apparent downside of the basing style my brother chose is that a road column looks strange.

One of the modeling choices made that impressed me the most is the casualty markers. Rather than simply using dice or a turn dial, a casualty figure is mounted to the dial.

The advance of the Loyalists sputtered for long enough that the Colonial Regulars shook out into line in a manner resembling professional.

The sluggish advance of the Brits also allowed the 1st Continental Light Dragoons (unfinished bases and all) to wrap around the left flank and "threaten" the British position.

Assisting the Colonial Light Infantry against the Hessians, the 3pdr battery redeployed to the right flank.

With the Americans now showing some sense of professionalism and tactical acumen, the Loyalists were presented with a much more difficult advance. This was compounded by the breaking of the 54th West Norfolk Regiment of Foot.

Adding insult to injury the blasphemous cavalry exploited a mistake by the Loyalists by charging into the flank of the 6pdr battery.

The mighty light dragoons annihilated the Loyalist artillery and continued into the flanks of the British lines full of anger and vinegar, however, their enthusiasm was soured when they were repulsed.

The fortunes of the British effort now rested with the Hessians. Unfortunately, they were having difficulties of their own facing down the fury of the 3pdr.

The situation of the British appeared untenable with a composed line of Colonials facing them.

Seeing the wavering of the Loyalist lines the Hessians retreated in the face of the Light Infantry and 3pdr.

However, the British were stubborn and fell back and began to redress their lines.

This gave time for the 1st Continental Light Dragoons to sweep further down the flank and threaten the Loyalists again.

In response the Loyalists wheeled the Prince of Whales American Regiment to face the Dragoons.

Beginning to reform themselves, the Hessians advanced again upon the bulwark of the 3pdr.

Suspecting that the Light Infantry and 3pdr may not be able to continue their performance, the 2nd Rhode Island Regiment of Continentals moved to support them.

Having successfully pulled a Regiment of Loyalists off the main line, the Light Dragoons fell back on the left flank.

The ongoing shenanigans on the flanks did not impede the Loyalist center from reordering itself.

Even the Hessians began to display why the Colonials feared them by readying themselves.

The Colonials moved the Massachusetts Militia to prevent a flank by the Prince of Whales. Worryingly, the British immediately began measuring the distance between the lines.

Thankfully the 1st Rhode Island were able to advance into the field to prevent any dastardly Loyalist plans.

Now free to maneuver, the Militia charged the Prince of Whales Regiment. Unfortunately, this action failed and the Militia, up to this point the most reliable unit on the battlefield, disappeared.

And yet the rashness was not over. Not wanting the Militia to have all the glory, the 1st Light Dragoons charged the Prince of Whales Regiment. However, this beaten and battered squadron of horse failed to make a noticeable impact and were repulsed with little fanfare.
Faced with a flank being turned and a British center that refused to buckle, the Colonials ceded the field. I thoroughly enjoyed this game with its back and forth feel and of course the collection was a beauty to look at. I am excited to see what additions will appear over the next few months.
This game was played using Black Powder by Warlord games. A second edition has now been released.
As a bonus here are some close up shots of the collection:


I enjoyed that, thanks for posting. Nice to see Black Powder being used for a smaller game. Your armies look lovely.
ReplyDelete