Painting Tutorial - Starfleet - TNG
Hello everyone, I present to you today a painting guide on how to paint small scale Starfleet ships from the TNG era, or at least my way of doing things. For this tutorial I will be walking through the steps of painting a Sovereign Class Explorer best seen as the Enterprise-E. Most of the steps involved are common to all Starfleet ships from this era. The model that I chose came from shapeways.com and can be found at the following link: http://shpws.me/ITL7
This exquisite model is in 1/7000 scale and measures 9.8cm/3.9in long. As you can guess the details on this model are very, very small which creates a different palette than a larger model would. Certain techniques will be used in response to the scale of these details.

As with any miniature straight out of its packaging our first step is to clean the model. Using a clean toothbrush, warm water, and dish soap we will first scrub our model to get any agents left over from the manufacturing process. Be careful not to scrub too hard in the case of resin models as you may break delicate components. Like nacelle struts. Like I did. Then you will have to carefully glue them back together. This is also the time to prep your model for whatever basing method you use, in my case a hole drilled into the secondary hole to accommodate a peg. Since we have to wait a couple of hours for the model to dry, we will watch Star Trek: First Contact in its entirety.

Our next step is to gather reference material from which to base our model. In this case, through the use of some Google-Fu, I settled upon this mock-up showing multiple angles of the Sovereign. Just look at those sexy lines!

With our reference material handy we must now decide what colors, brush sizes, washes, after effects, and what brew to drink while painting this miniature. The supplies I used are the following:
Large Dry Brush
Large Area Brush
Detail Brush
Detail Block Brush (A 000 brush with its point cut off)
Medium Grey Spray Base Coat
Medium-Light Grey Acrylic
Charcoal Acrylic
Graphite Acrylic
Black Acrylic
White Acrylic
Deep Red Acrylic
Red-Orange Acrylic
Bright Blue Acrylic
Yellow Acrylic
Suitable Area Wash (in this case, Citadel Nuln Oil)
Gloss Brush Coat
Matte Spray Sealer
1 or more Premium Beers

With our supplies gathered, our reference material handy, model prepped, and at least 1 brew finished, we can get down to business. Using an even application, base coat your model in the medium grey. It is always better to apply multiple thinner coats than 1 heavier coat. Since we have to wait a short while for the base coat to dry we will now go watch the Enterprise take on the Scimitar in Nemesis: https://www.youtube.com/watch?v=56iTxduUacs

Using our Medium-Light Grey paint we will perform an even medium dry brush with our large drybrush across the entire model. Our intention is to cover all the surfaces but leave the recessed details a little darker.

Using our charcoal paint we will block paint, using our detail block brush, any dark paneling on the dorsal and ventral facings of the model. If we decide to paint every panel possible we will be at this for days and ultimately leave unsatisfied. Instead we will choose the most prominent and frankly easiest panels to paint that create the correct impression. At this scale impression is more important than exacting detail. The detail block brush is merely a high detail brush (such as a 000) with its tipped trimmed. This allows for more precision strait lines to be achieved.

For the Sovereign there is an additional dark paneling we must paint on the nacelles. Using our black paint and detail block brush, mostly to create a slight shade difference, we will now color in the nacelle grills along the side of each nacelle.

Using our yellow paint and the detail block brush we will color the escape pods. On the actual Sovereign model the escape pods are light grey but I have chosen to use the same yellow color as on the Galaxy class to unify this paint scheme with the rest of my fleet. If you wish to achieve higher canon accuracy, use a light grey instead. When painting these tiny escape pods do not fret about painting their shape perfectly. It is far more important to achieve a consistent spacing and to ensure a separation between the dots.

Using our area wash, in this case Nuln Oil, we now wash the entire surface of the model including the escape pods and hull paneling. I recommend using the detail block brush to perform this step. It does take longer, but on a model this small, using a larger brush makes the application inherently less precise. Our primary goal is to ensure as even an application as possible and to further darken the recessed details as well as provide shading to the escape pods. This wash will take a few minutes to dry so we will now go watch the conclusion of the Enterprise's battle with the Scimitar: https://www.youtube.com/watch?v=eSnzrxNIJd4

Using the Medium-Light Grey we originally used to dry brush the hull, and using the large area brush, we will perform a precision dry brush. To do this I advise using less paint on the brush than you first think to use. This dry brush is to be lightly applied to all the hull surface area being careful to lessen the effect on the hull paneling. When this step is complete use the matte sealer spray on the model. We are by no means done, but as you will see later, we need certain parts of this model to have a gloss.

Using the bright blue we will now block paint, using the detail block brush, the top of the nacelles. Also now realize that you forgot the paneling in the Impulse engine housings and paint them in using the charcoal.

Using the large area brush and our white paint we will perform a light and very careful drybrush of the bright blue. Our intention is to catch the details in this area to enhance the glowing blue look.

Next we will tackle the bussard collectors. Open both your deep red and your red-orange. Also make sure to include your finger in the photo! First block paint, using the detail block brush, the entire visible area of the bussard collector. While this is still wet apply the red-orange in a "splotchy" manner and then "swirl" the colors together. After some practice this will create a decent facsimile of the shifting look of the collectors.

Using the deep red and the detail block brush, paint the impulse manifolds.
 Using the yellow paint and the detail block brush, paint the entirety of the deflector dish yellow.

Using the detail brush and the black paint, paint the center of the dish black.

Using the detail brush and the white paint, place a small white dot at the center of the dish. Also make sure that you again include your finger in the picture.

Using the charcoal paint from earlier and the detail brush, carefully paint every phaser array. Individual preference may dictate a darker color for this step.

Using the detail block brush and the gloss coat, we will paint in the field coils, bussard collectors, impulse manifolds, and deflector dish such that they have a shine.

Using our white paint and the detail brush we will now paint in lights. I recommend at minimum running lights and certain specific lights such as on the bridge. Individual preferences/ambition may limit the number of lights that are painted beyond this. In this case I have painted a number of window lights as I believe that one of the most obvious details of a Starfleet ship is the array of lights strewn across its hull. Also at this point realize that you missed some escape pods on the upper saucer, quickly fix your mistake, and hope no one notices. We are now ready for basing and pretty pictures


This exquisite model is in 1/7000 scale and measures 9.8cm/3.9in long. As you can guess the details on this model are very, very small which creates a different palette than a larger model would. Certain techniques will be used in response to the scale of these details.
Step 1 - Model Prep

Step 2 - Reference Material

Our next step is to gather reference material from which to base our model. In this case, through the use of some Google-Fu, I settled upon this mock-up showing multiple angles of the Sovereign. Just look at those sexy lines!
Step 3 - Gather Supplies

With our reference material handy we must now decide what colors, brush sizes, washes, after effects, and what brew to drink while painting this miniature. The supplies I used are the following:
Large Dry Brush
Large Area Brush
Detail Brush
Detail Block Brush (A 000 brush with its point cut off)
Medium Grey Spray Base Coat
Medium-Light Grey Acrylic
Charcoal Acrylic
Graphite Acrylic
Black Acrylic
White Acrylic
Deep Red Acrylic
Red-Orange Acrylic
Bright Blue Acrylic
Yellow Acrylic
Suitable Area Wash (in this case, Citadel Nuln Oil)
Gloss Brush Coat
Matte Spray Sealer
1 or more Premium Beers
Step 4 - Base Coat

With our supplies gathered, our reference material handy, model prepped, and at least 1 brew finished, we can get down to business. Using an even application, base coat your model in the medium grey. It is always better to apply multiple thinner coats than 1 heavier coat. Since we have to wait a short while for the base coat to dry we will now go watch the Enterprise take on the Scimitar in Nemesis: https://www.youtube.com/watch?v=56iTxduUacs
Step 5 - Base Dry Brush

Using our Medium-Light Grey paint we will perform an even medium dry brush with our large drybrush across the entire model. Our intention is to cover all the surfaces but leave the recessed details a little darker.
Step 6 - Panel Blocking
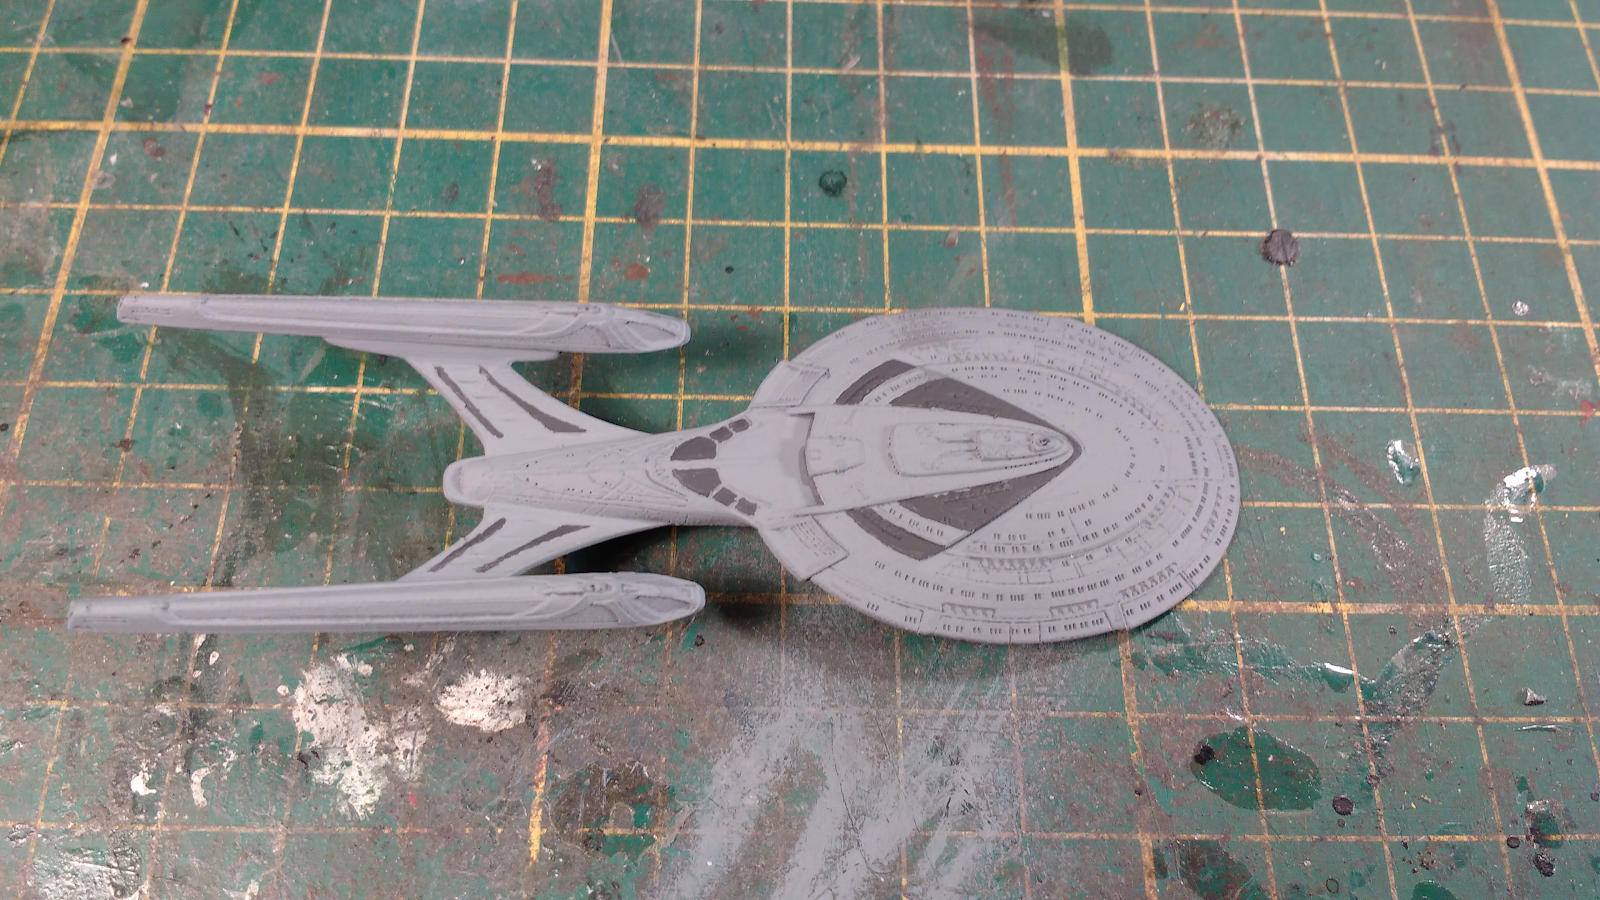
Using our charcoal paint we will block paint, using our detail block brush, any dark paneling on the dorsal and ventral facings of the model. If we decide to paint every panel possible we will be at this for days and ultimately leave unsatisfied. Instead we will choose the most prominent and frankly easiest panels to paint that create the correct impression. At this scale impression is more important than exacting detail. The detail block brush is merely a high detail brush (such as a 000) with its tipped trimmed. This allows for more precision strait lines to be achieved.
Step 7 - Nacelle Grills

For the Sovereign there is an additional dark paneling we must paint on the nacelles. Using our black paint and detail block brush, mostly to create a slight shade difference, we will now color in the nacelle grills along the side of each nacelle.
Step 8 - Escape Pods

Using our yellow paint and the detail block brush we will color the escape pods. On the actual Sovereign model the escape pods are light grey but I have chosen to use the same yellow color as on the Galaxy class to unify this paint scheme with the rest of my fleet. If you wish to achieve higher canon accuracy, use a light grey instead. When painting these tiny escape pods do not fret about painting their shape perfectly. It is far more important to achieve a consistent spacing and to ensure a separation between the dots.
Step 9 - Hull Wash

Using our area wash, in this case Nuln Oil, we now wash the entire surface of the model including the escape pods and hull paneling. I recommend using the detail block brush to perform this step. It does take longer, but on a model this small, using a larger brush makes the application inherently less precise. Our primary goal is to ensure as even an application as possible and to further darken the recessed details as well as provide shading to the escape pods. This wash will take a few minutes to dry so we will now go watch the conclusion of the Enterprise's battle with the Scimitar: https://www.youtube.com/watch?v=eSnzrxNIJd4
Step 10 - Hull Highlight

Using the Medium-Light Grey we originally used to dry brush the hull, and using the large area brush, we will perform a precision dry brush. To do this I advise using less paint on the brush than you first think to use. This dry brush is to be lightly applied to all the hull surface area being careful to lessen the effect on the hull paneling. When this step is complete use the matte sealer spray on the model. We are by no means done, but as you will see later, we need certain parts of this model to have a gloss.
Step 11 - Field Coils

Using the bright blue we will now block paint, using the detail block brush, the top of the nacelles. Also now realize that you forgot the paneling in the Impulse engine housings and paint them in using the charcoal.
Step 12 - Field Coil Highlight

Using the large area brush and our white paint we will perform a light and very careful drybrush of the bright blue. Our intention is to catch the details in this area to enhance the glowing blue look.
Step 13 - Bussard Collectors

Next we will tackle the bussard collectors. Open both your deep red and your red-orange. Also make sure to include your finger in the photo! First block paint, using the detail block brush, the entire visible area of the bussard collector. While this is still wet apply the red-orange in a "splotchy" manner and then "swirl" the colors together. After some practice this will create a decent facsimile of the shifting look of the collectors.
Step 14 - Impulse Engines

Using the deep red and the detail block brush, paint the impulse manifolds.
Step 15 - Deflector Dish Part 1

Step 16 - Deflector Dish Part 2

Using the detail brush and the black paint, paint the center of the dish black.
Step 17 - Deflector Dish Part 3

Using the detail brush and the white paint, place a small white dot at the center of the dish. Also make sure that you again include your finger in the picture.
Step 18 - Phaser Arrays

Using the charcoal paint from earlier and the detail brush, carefully paint every phaser array. Individual preference may dictate a darker color for this step.
Step 19 - Shiny Bits

Using the detail block brush and the gloss coat, we will paint in the field coils, bussard collectors, impulse manifolds, and deflector dish such that they have a shine.
Step 20 - Lights, Lights, and More Lights!

Using our white paint and the detail brush we will now paint in lights. I recommend at minimum running lights and certain specific lights such as on the bridge. Individual preferences/ambition may limit the number of lights that are painted beyond this. In this case I have painted a number of window lights as I believe that one of the most obvious details of a Starfleet ship is the array of lights strewn across its hull. Also at this point realize that you missed some escape pods on the upper saucer, quickly fix your mistake, and hope no one notices. We are now ready for basing and pretty pictures
Step 21 - Picture Time
With our model now complete we can take pictures in our home-made light box so that we can post them on the internet, receive muted praise, and maintain our bloated ego.


Thank you, I can answer any questions you have.
ReplyDeleteThank You! Excellent tutorial!
ReplyDeleteYour welcome, hopefully this will help others.
DeleteImpressive result thanks for sharing.
ReplyDeleteYou're Welcome!
DeleteWhat stands are you using?
ReplyDeleteI am using Litko flight base pegs but I am cutting the bases out of plastic myself.
DeleteI know this is an old post but it has been very helpful for me. I just have one question. Are you mixing any medium with your nuln oil when you do the wash or just using it straight?
ReplyDelete