Ado Sector Campaign - Part 4
Part 3
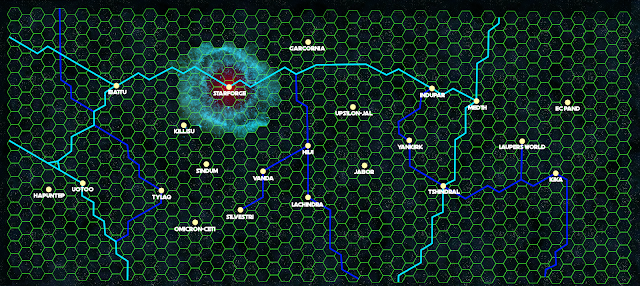
The 2nd Battle of Tylaq


The Ado Sector Campaign continues. A small lull has occurred since the 1st Battle of Tylaq.

The Imperials have made no aggressive moves towards the Rebels, not that they have had much opportunity, the campaign feeling more like a game of cat and mouse than a pitched battle. For their part the Rebels have not pursued any serious objectives outside their constant propaganda broadcasts into unoccupied Imperial systems and their campaign in the Tylaq system. This calm was disrupted by a new battle.
The 2nd Battle of Tylaq
After having successfully driven off the Imperial forces in the Tylaq system, the Rebel fleet under the ANS Paragon began a campaign of liberation. A Rebel ground force was landed on Tylaq Prime that proceeded to free thousands of Twi'lek slaves from the work camps. Several GR-75 Medium Transports were landed on the planet to offload the Rebel troops while an Action VI Transport orbited the world receiving refugees lifted into orbit by the assault shuttles from the ANS Paragon. All was going well with the operation for a few days.

The ANS Paragon, an Assault Class Heavy Cruiser, maintained a high orbit of Tylaq Prime lending the assistance of its Delta DX-9 assault shuttles and JV-7 escort shuttles to the ground effort. A CR90, Braha'tok, and Hammerhead corvette all assisted to form a security cordon.

In a flash the operation was disrupted by the arrival of an Imperial task force. The HIMS Crimson Death, a Carrack Class Cruiser Mk II, led a fleet of starships including a Nebulon-B Frigate, Lancer Frigate, Arquitens Frigate, four CR90 Corvettes, four DP20 Corvettes, and two Raider Corvettes. This fleet topped out at a cruiser and faced a heavy cruiser but the shear number of ships and turbolasers was worrying.

The Imperial fleet immediately accelerated hard towards the gas giant system, it's gravity well having pulled them from hyperspace outside weapons range of the Rebel starships. The Nebulon-B began launching its TIEs, starting with bombers.
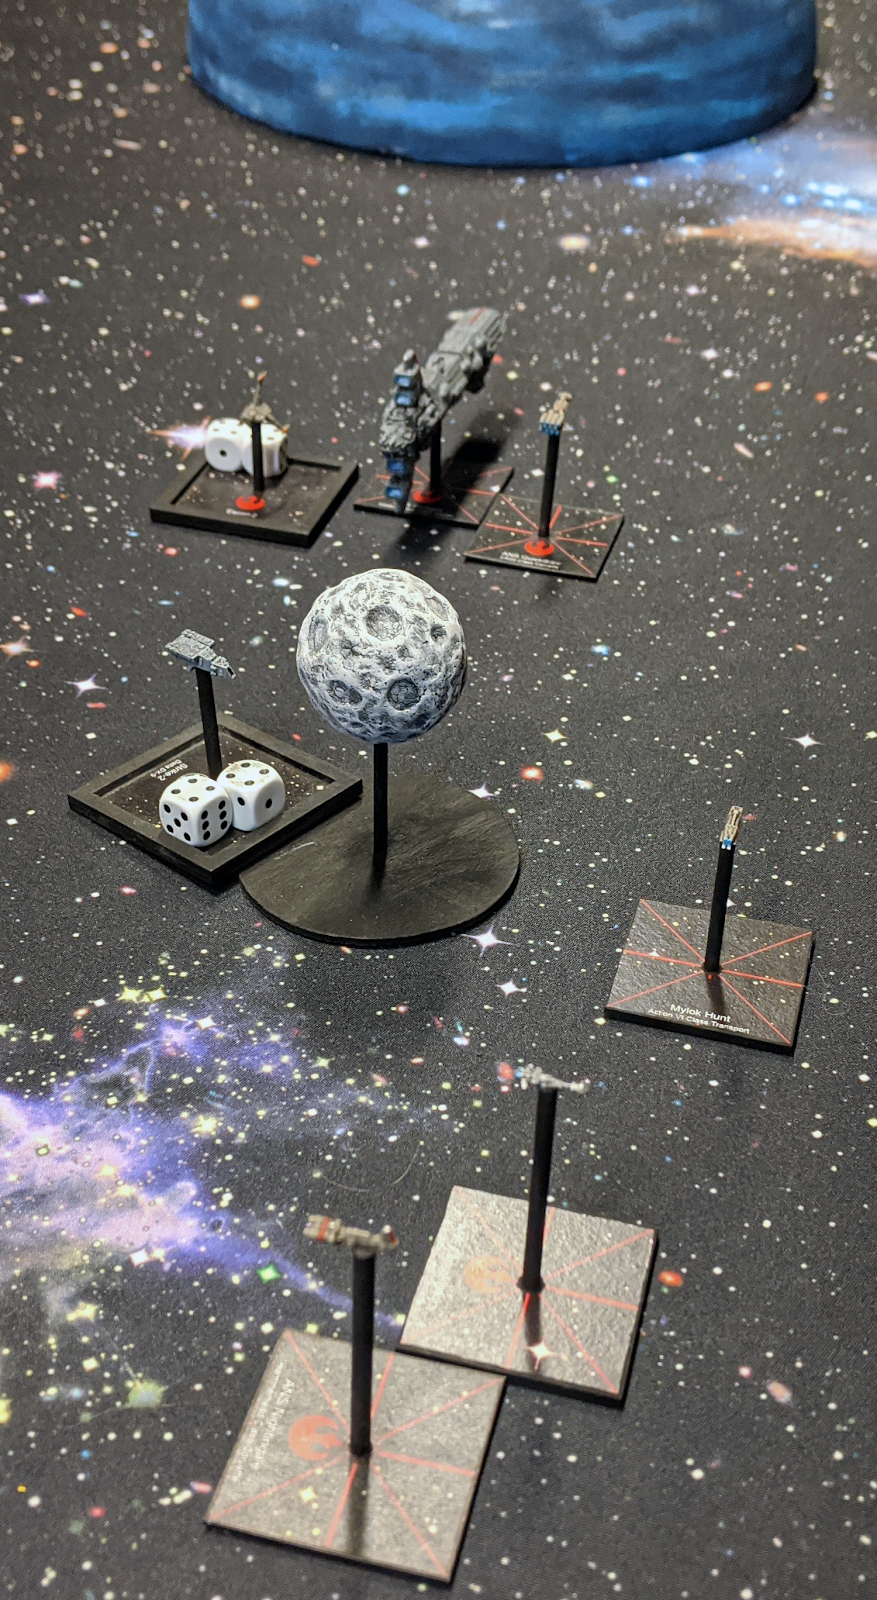
With boots on the ground of Tylaq Prime, transports landed, and a transport half filled with refugees in orbit, the Rebel commander could not abandon the planet. The Assault Cruiser turned into the Imperial fleet and the escorting corvettes raced to join the big ship.

As the range closed the number of Imperial ships began to worry the Rebel commander, even if the mass differential told a different story. The Imperial fleet had picked up so much speed that the closing rate was very high. The Rebel commander wondered if the Imperials were hoping to simply fly right past his fleet. What did they know?

At the close range between the ships, the lighter turbolasers on the corvettes were at optimal distance. The Assault Cruiser's forward shield took impact after impact glowing brightly and then finally collapsing. The DP20 corvettes, easily the best small ships in the battle, raked the forward hull of the heavy cruiser until the structural integrity of the bow of the ship collapsed entirely leaving a trail of debris and bodies behind it. In response the ANS Paragon, with the assistance of her JV-7s utterly annihilated one of the deadly corvettes.

Ignoring the escort shuttles, the starfighters from the Nebulon-B vectored on the Braha'tok Class Corvette with its Hammerhead escort. Thinking that these tiny ships could put up no real resistance, the CAG flew in arrogantly. However, the Imperials were unfamiliar with this little ship and its eight concussion missile tubes and many light turbolaser cannons. Both squadrons of TIEs were eliminated before entering weapons range.

As the Assault Cruiser turned to starboard in an attempt to shield its wrecked front end, the Imperial fleet made a 135 degree turn to port, away from the Rebel fleet. In that moment a massive snap occurred and a Dauntless Class Star Destroyer emerged from hyperspace surrounded by a veritable cloud of starfighters. X-Wings, A-Wings, Y-Wings, Z-95s, and B-Wings formed a massive strike group. The Dauntless had been sitting just outside the system in reserve waiting to be called in for just such a situation. The Imperials moved like they knew it was coming but this could have simply been coincidence.

Immediately the Dauntless made its presence known. Dozens of heavy and medium turbolasers and ion cannons tore into the reduced squadron of DP20s. In short order all three fell to the preponderance of firepower coming from their rear.

The starfighters around the Dauntless were quickly dispatched to high value targets. Y-Wings loaded with proton bombs chased after the Arquitens frigate quickly destroying her.

B-Wings loaded with proton rockets sailed to the Nebulon-B, somewhat separated from the rest of the Imperial fleet. In short order the Nebulon-B drifted in two pieces.

But the Imperials were not without their retaliation. The starboard turn of the Assault Cruiser had left her front exposed to the majority of the fleet. Even while losing ships to the massive Dauntless, the Imperial starships continued to pour fire into the damaged bow. Eventually the ANS Paragon broke apart suffering from internal fires and explosions, a victim of a thousand cuts. The remaining Imperial vessels, having reached the edge of the gravity well, entered hyperspace and escaped.
The question of who won this battle is very much undecided. The Imperials lost two frigates and four powerful corvettes but the Rebels lost a heavy cruiser, a nearly irreplaceable asset. It seemed as though the Imperial fleet had been performing a slash and burn attack rather than any real effort to force the Rebels out. If not for the arrival of the Dauntless, the Imperial fleet likely could have destroyed the Rebels and retaken the system. For now the Rebels continue their campaign of liberation in Tylaq.


This comment has been removed by a blog administrator.
ReplyDelete